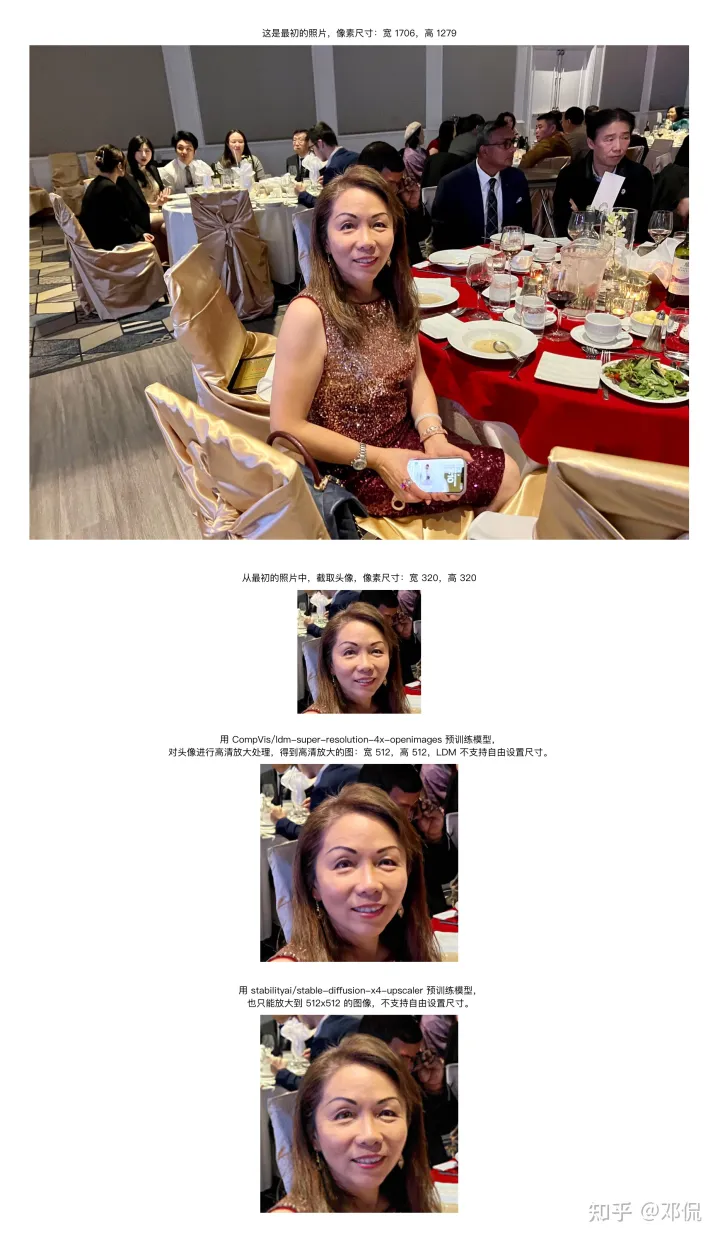
本文有两个主题,一个是如何使用 Hugging Diffusers 框架,另一个是如何用 Diffusers 框架,实现图像的高清放大。
Huggingface Diffusers 框架,提供了高清放大图像的 APIs,同时还提供了预训练模型 stabilityai/stable-diffusion-x4-upscaler。这个预训练模型,似乎是 Huggingface 主推的高清放大模型。这个模型的 Model Card 里,有简短的程序,说明如何使用。
除此之外,Huggingface 还提供了第二个预训练模型,CompVis/ldm-super-resolution-4x-openimages。这个预训练模型的 Model Card 里,也有简短的程序,说明如何使用。
参考两个 Model Cards,写了一段程序,见附录一。用同一张头像作为输入图像,看看两个预训练模型的效果如何。
以下各个段落,记录在使用过程中,遇到的问题,以及解决方案。
用 Huggingface Diffusers,实现图像的高清放大。
1. access_token:
使用预训练模型 stabilityai/stable-diffusion-x4-upscaler,似乎很简单,但是使用过程中,遇到如下报错,
PytorchStreamReader failed reading zip archive: failed finding central directory.
查了 StackOverflow,原因似乎是预训练模型下载不完整导致。
附录一的程序运行时,会自动下载并缓存预训练模型的内容。我们租用的是 MistGPU 的 GPU 主机,它的缓存地址是 /home/mist/.cache/ 文件夹。
$ ls -aR /home/mist/.cache/huggingface/diffusers/models–stabilityai–stable-diffusion-x4-upscaler
/home/mist/.cache/huggingface/diffusers/models–stabilityai–stable-diffusion-x4-upscaler:
. .. blobs refs snapshots
/home/mist/.cache/huggingface/diffusers/models–stabilityai–stable-diffusion-x4-upscaler/blobs:
.
..
113c9c05070fd0647f57884af1a15871a64dd298
2188379b05015f531d61503e714234d00a64939792f3098b324e516547f0194f
269c89302cd24cd8d3937982450d79f106f405be
33478c297ec29218100f8ee86007b3ab4c2701896d5ca5c9e3a84fc29f678183
3def213b5da2e3dc8b82e313d106374e70cc7a34
469be27c5c010538f845f518c4f5e8574c78f7c8
615fdb58220250bb05bc9f1382327683a4e96728
707195f27097fb84d29f56c8a0ea9300b5b36a83
76e821f1b6f0a9709293c3b6b51ed90980b3166b
7bee7a4acd3ccb2ee9c470d7e9105dffd48d449da4d3d4a5056f7d9e51f4fc5e
887ab066b7264fd29980113a98db6acd349db0e5
9701b233be392017374527288e155239afa0450365fea2a6a779faa33afc8c37
aad5ad10ade11526c5036b5f4410dda9a55d5869
ae0c5be6f35217e51c4c000fd325d8de0294e99c
b14ab7fbdf9d227b0ebd443de6502c2a0f69e109
b6dc05aaae1ba43c230612932492a81e431126582481fd6c7d94c6b15f9ce584
cce6febb0b6d876ee5eb24af35e27e764eb4f9b1d0b7c026c8c3333d4cfc916c
/home/mist/.cache/huggingface/diffusers/models–stabilityai–stable-diffusion-x4-upscaler/refs:
. .. main
/home/mist/.cache/huggingface/diffusers/models–stabilityai–stable-diffusion-x4-upscaler/snapshots:
. .. 19b610c68ca7572defb6e09e64d1063f32b4db83
/home/mist/.cache/huggingface/diffusers/models–stabilityai–stable-diffusion-x4-upscaler/snapshots/19b610c68ca7572defb6e09e64d1063f32b4db83:
. .. low_res_scheduler model_index.json scheduler text_encoder tokenizer unet vae
/home/mist/.cache/huggingface/diffusers/models–stabilityai–stable-diffusion-x4-upscaler/snapshots/19b610c68ca7572defb6e09e64d1063f32b4db83/low_res_scheduler:
. .. scheduler_config.json
/home/mist/.cache/huggingface/diffusers/models–stabilityai–stable-diffusion-x4-upscaler/snapshots/19b610c68ca7572defb6e09e64d1063f32b4db83/scheduler:
. .. scheduler_config.json
/home/mist/.cache/huggingface/diffusers/models–stabilityai–stable-diffusion-x4-upscaler/snapshots/19b610c68ca7572defb6e09e64d1063f32b4db83/text_encoder:
. .. config.json model.safetensors pytorch_model.bin
/home/mist/.cache/huggingface/diffusers/models–stabilityai–stable-diffusion-x4-upscaler/snapshots/19b610c68ca7572defb6e09e64d1063f32b4db83/tokenizer:
. .. merges.txt special_tokens_map.json tokenizer_config.json vocab.json
/home/mist/.cache/huggingface/diffusers/models–stabilityai–stable-diffusion-x4-upscaler/snapshots/19b610c68ca7572defb6e09e64d1063f32b4db83/unet:
. config.json diffusion_pytorch_model.safetensors
.. diffusion_pytorch_model.bin .ipynb_checkpoints
/home/mist/.cache/huggingface/diffusers/models–stabilityai–stable-diffusion-x4-upscaler/snapshots/19b610c68ca7572defb6e09e64d1063f32b4db83/unet/.ipynb_checkpoints:
. .. config-checkpoint.json
/home/mist/.cache/huggingface/diffusers/models–stabilityai–stable-diffusion-x4-upscaler/snapshots/19b610c68ca7572defb6e09e64d1063f32b4db83/vae:
. .. config.json diffusion_pytorch_model.bin diffusion_pytorch_model.safetensors
# mist @ MistGPU-349 in ~ [18:21:55]
$
先删除缓存,然后再运行的程序,使之自动下载缓存预训练模型。重复以上动作,但是仍然遭遇报错。
后来试了试 access_token,还有其它一些修复方法,就出乎意料地运行成功了。
查阅 Huggingface 的文献,使用 stabilityai/stable-diffusion-x4-upscaler 预训练模型,似乎不需要 access_token,或许是因为我们更新了 diffusers、transformers 等等 Python packages,把旧版本的 bugs 解决了。
下面介绍一下 Huggingface access_token 的使用方法,以备以后需要。
1)概念介绍,参阅 Huggingface 这两篇文档。
《 User access tokens 》和《 Loading pipelines that require access request
》。
2)实际操作分两步。
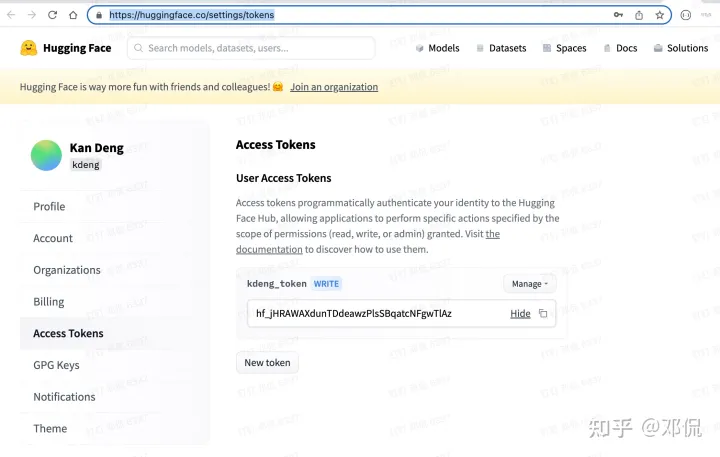
第一步,进入 Huggingface 相关页面,生成属于自己的 Huggingface access token。
似乎对应每位 Huggingface 用户,专属他的 access token,一直是同一个字符串,字符串以 hf_ 开头。
第二步,在程序中引用专属自己的 access_token。
model_stable = “stabilityai/stable-diffusion-x4-upscaler”
access_token = “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”
pipeline_stable = StableDiffusionUpscalePipeline.from_pretrained(
model_stable, torch_dtype=torch.float16, use_auth_token = access_token)
2. prompt 似乎无用:
使用 stabilityai/stable-diffusion-x4-upscaler 预训练模型时,需要提供一段话的 prompt,引导预训练模型进行高清放大处理,见如下程序片段。
经过反复测试,prompt 对于高清放大人像,似乎没有明显作用。
prompt = “a portrait of a beautiful woman”
upscaled_image = pipeline_stable(prompt=prompt, image=low_res_img).images[0]
upscaled_image.save(“upscaled_portrait_stable.png”)
StableDiffusionUpscalePipeline 的源码,可以查阅Github Repo。
但是实际使用的 pipeline,未必与 Github repo 保持一致,所以,仍然需要查阅部署在本地,实际使用的源码。因为我们租用的是 MistGPU,部署的 Python Packages 都在 /mistgpu/site-packages/ 文件夹里。
部署在本地的 StableDiffusionUpscalePipeline 的源码,可以查阅 /mistgpu/site-packages/ 文件夹。
$ ls /mistgpu/site-packages/diffusers/pipelines/stable_diffusion
__init__.py pipeline_stable_diffusion_img2img.py
pipeline_cycle_diffusion.py pipeline_stable_diffusion_inpaint_legacy.py
pipeline_flax_stable_diffusion.py pipeline_stable_diffusion_inpaint.py
pipeline_onnx_stable_diffusion_img2img.py pipeline_stable_diffusion_k_diffusion.py
pipeline_onnx_stable_diffusion_inpaint_legacy.py pipeline_stable_diffusion.py
pipeline_onnx_stable_diffusion_inpaint.py pipeline_stable_diffusion_upscale.py
pipeline_onnx_stable_diffusion.py __pycache__
pipeline_stable_diffusion_depth2img.py safety_checker_flax.py
pipeline_stable_diffusion_image_variation.py safety_checker.py
Huggingface Pipeline 的使用方法,可以参阅它的源码中的 __call__( ) 函数。
例如,StableDiffusionUpscalePipeline 的使用方法,可以参阅它的 __call__( ) 函数,如下所示。
@torch.no_grad()
def __call__(
self,
prompt: Union[str, List[str]],
image: Union[torch.FloatTensor, PIL.Image.Image, List[PIL.Image.Image]],
num_inference_steps: int = 75,
guidance_scale: float = 9.0,
noise_level: int = 20,
negative_prompt: Optional[Union[str, List[str]]] = None,
num_images_per_prompt: Optional[int] = 1,
eta: float = 0.0,
generator: Optional[Union[torch.Generator, List[torch.Generator]]] = None,
latents: Optional[torch.FloatTensor] = None,
output_type: Optional[str] = “pil”,
return_dict: bool = True,
callback: Optional[Callable[[int, int, torch.FloatTensor], None]] = None,
callback_steps: Optional[int] = 1,
):
r”””
Function invoked when calling the pipeline for generation.
Args:
prompt (`str` or `List[str]`):
The prompt or prompts to guide the image generation.
image (`PIL.Image.Image` or List[`PIL.Image.Image`] or `torch.FloatTensor`):
`Image`, or tensor representing an image batch which will be upscaled. *
num_inference_steps (`int`, *optional*, defaults to 50):
The number of denoising steps. More denoising steps usually lead to a higher quality image at the
expense of slower inference.
guidance_scale (`float`, *optional*, defaults to 7.5):
Guidance scale as defined in [Classifier-Free Diffusion Guidance](https://arxiv.org/abs/2207.12598).
`guidance_scale` is defined as `w` of equation 2. of [Imagen
Paper](https://arxiv.org/pdf/2205.11487.pdf). Guidance scale is enabled by setting `guidance_scale >
1`. Higher guidance scale encourages to generate images that are closely linked to the text `prompt`,
usually at the expense of lower image quality.
negative_prompt (`str` or `List[str]`, *optional*):
The prompt or prompts not to guide the image generation. Ignored when not using guidance (i.e., ignored
if `guidance_scale` is less than `1`).
num_images_per_prompt (`int`, *optional*, defaults to 1):
The number of images to generate per prompt.
eta (`float`, *optional*, defaults to 0.0):
Corresponds to parameter eta (η) in the DDIM paper: https://arxiv.org/abs/2010.02502. Only applies to
[`schedulers.DDIMScheduler`], will be ignored for others.
generator (`torch.Generator`, *optional*):
One or a list of [torch generator(s)](https://pytorch.org/docs/stable/generated/torch.Generator.html)
to make generation deterministic.
latents (`torch.FloatTensor`, *optional*):
Pre-generated noisy latents, sampled from a Gaussian distribution, to be used as inputs for image
generation. Can be used to tweak the same generation with different prompts. If not provided, a latents
tensor will ge generated by sampling using the supplied random `generator`.
output_type (`str`, *optional*, defaults to `”pil”`):
The output format of the generate image. Choose between
[PIL](https://pillow.readthedocs.io/en/stable/): `PIL.Image.Image` or `np.array`.
return_dict (`bool`, *optional*, defaults to `True`):
Whether or not to return a [`~pipelines.stable_diffusion.StableDiffusionPipelineOutput`] instead of a
plain tuple.
callback (`Callable`, *optional*):
A function that will be called every `callback_steps` steps during inference. The function will be
called with the following arguments: `callback(step: int, timestep: int, latents: torch.FloatTensor)`.
callback_steps (`int`, *optional*, defaults to 1):
The frequency at which the `callback` function will be called. If not specified, the callback will be
called at every step.
Returns:
[`~pipelines.stable_diffusion.StableDiffusionPipelineOutput`] or `tuple`:
[`~pipelines.stable_diffusion.StableDiffusionPipelineOutput`] if `return_dict` is True, otherwise a `tuple.
When returning a tuple, the first element is a list with the generated images, and the second element is a
list of `bool`s denoting whether the corresponding generated image likely represents “not-safe-for-work”
(nsfw) content, according to the `safety_checker`.
“””
3. LDM 预训练模型更容易使用:
如前文所述,针对图像的高清放大,Huggingface 目前提供了两个预训练模型,一个是stabilityai/stable-diffusion-x4-upscaler,另一个是 CompVis/ldm-super-resolution-4x-openimages
。
使用 stabilityai/stable-diffusion-x4-upscaler 时,必须使用 StableDiffusionUpscalePipeline;
而使用 CompVis/ldm-super-resolution-4x-openimages 时,必须使用 LDMSuperResolutionPipeline,见代码。
1. 参阅 LDMSuperResolutionPipeline 的 __call__( ) 函数,它并不需要输入一句话的 prompt 提示。
而且下载缓存这个预训练模型,也没有遇到下载不完整等等报错。
2. Stable 模型 vs LDM 模型,都只能把原生图像,放大到 512×512,放大尺寸不能自由设置。
3. 对比Stable 模型 vs LDM 模型,两个模型放大的照片,发现效果差不多。
结论,使用 LDMSuperResolutionPipeline 目前是更好的选择。
附录一. test_img_super_resolution.py
# test_img_super_resolution.py
# 2023/01/24
#
from PIL import Image
from io import BytesIO
from diffusers import LDMSuperResolutionPipeline
from diffusers import StableDiffusionUpscalePipeline
import torch
device = “cuda” if torch.cuda.is_available() else “cpu”
# Open an image as a PIL.Image
low_res_img = Image.open(“low_res_portrait.jpg”)
low_res_img = low_res_img.resize((128, 128))
# Model 1. Modified from:
# https://huggingface.co/stabilityai/stable-diffusion-x4-upscaler
# load model and scheduler
model_stable = “stabilityai/stable-diffusion-x4-upscaler”
access_token = “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”
pipeline_stable = StableDiffusionUpscalePipeline.from_pretrained(model_stable, torch_dtype=torch.float16, use_auth_token = access_token)
pipeline_stable = pipeline_stable.to(device)
prompt = “a portrait of a beautiful woman”
upscaled_image = pipeline_stable(prompt=prompt, image=low_res_img).images[0]
upscaled_image.save(“upscaled_portrait_stable.png”)
# Model 2. Modified from:
# https://huggingface.co/CompVis/ldm-super-resolution-4x-openimages
model_ldm = “CompVis/ldm-super-resolution-4x-openimages”
pipeline_ldm = LDMSuperResolutionPipeline.from_pretrained(model_ldm)
pipeline_ldm = pipeline_ldm.to(device)
# run pipeline in inference (sample random noise and denoise)
upscaled_image = pipeline_ldm(low_res_img, num_inference_steps=100, eta=1).images[0]
# save image
upscaled_image.save(“upscaled_portrait_ldm.png”)


暂无评论内容